| 일 | 월 | 화 | 수 | 목 | 금 | 토 |
|---|---|---|---|---|---|---|
| 1 | ||||||
| 2 | 3 | 4 | 5 | 6 | 7 | 8 |
| 9 | 10 | 11 | 12 | 13 | 14 | 15 |
| 16 | 17 | 18 | 19 | 20 | 21 | 22 |
| 23 | 24 | 25 | 26 | 27 | 28 | 29 |
| 30 |
- object detection
- 김성훈 교수님 PyTorch
- pytorch zero to all
- 해리스 코너 검출
- TensorFlow
- 모두의 딥러닝
- 미디언 필터링
- 딥러닝 스터디
- 케라스 정리
- 컴퓨터 비전
- 영상처리
- Pytorch Lecture
- 모두의 딥러닝 예제
- 파이토치 강의 정리
- c++공부
- c언어 정리
- MFC 프로그래밍
- 골빈해커
- pytorch
- 파이토치
- 파이토치 김성훈 교수님 강의 정리
- c++
- c언어
- matlab 영상처리
- tensorflow 예제
- 딥러닝 공부
- 팀프로젝트
- 가우시안 필터링
- C언어 공부
- 딥러닝
- Today
- Total
ComputerVision Jack
[컴퓨터 비전 - openCV주요 기능] 본문
openCV 라이브러리를 사용한 주요기능 소개
동영상 파일 다루기
VideoCapture클래스
동영상도 정지한 이미지 영상을 저장한 형태.
동영상의 정지한 이미지 형태 = 프레임
따라서 동영상에서 프레임을 추출한 후, 영상처리기법을 적용시킨다.
ViodeoCapture::VideoCapture(const String& filename, int apiPreference = CAP_ANY);
#video capture클래스 생성자
bool VideoCapture::open(const String& filename, int apiPreference = CAP_ANY);
#동영상 파일을 읽어와서 확인하는 함수
VideoCapture& VideoCapture::operator >>(Mat& image);
bool videoapture::read(OutputArray image);
#한 프레임을 받아오기 위해서 >>연산자 재정의 또는 read()함수를 사용한다.
double VideoCapture::get(nt propId) const;
#파일로 부터 여러가지 정보를 받아오는 함수.
bool VideoCapture::set(int propId, double value);
#파일재생과 관련된 속성값을 설정할 때 사용하는 함수
[코드]
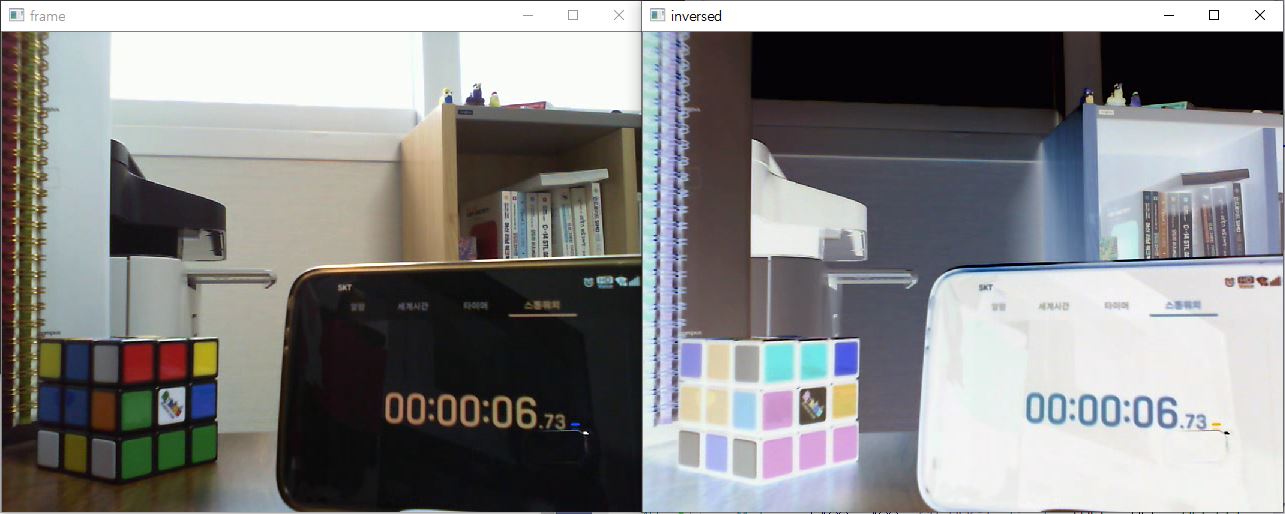
VideoCapture cap("../_res/stopwatch.avi");
#video객체 생성후 생성자를 통하여 준비된 동영상으로 초기화
cout << "Frame width" << cvRound(cap.get(CAP_PROP_FRAME_WIDTH)) << endl;
cout << "Frame height" << cvRound(cap.get(CAP_PROP_FRAME_HEIGHT)) << endl;
cout << "Frame count" << cvRound(cap.get(CAP_PROP_FRAME_COUNT)) << endl;
#get()함수를 통하여 동영상과 관련된 정보를 받아온다.
double fps = cap.get(CAP_PROP_FPS);
cout << "FPS : " << fps << endl;
#초당 프레임 반환인 fps의 값을 가져온다.
int delay = cvRound(1000 / fps);
Mat frame, inversed;
#읽어온 동영상을 반전시켜 저장할 Mat객체 생성
while (true) {
cap >> frame;
if (frame.empty())
break; //frame 다가져오면 탈출.
inversed = ~frame;
imshow("frame", frame);
imshow("inversed", inversed);
..
}
#cap 객체에서 frame에 정지영상을 저장
그리기 함수
void line(InputOutputArray img, Point ptr1, Point ptr2, const Scalar& color,
int thickness = 1, int lineType = LINE_8, int shift = 0);
#직선 그리기 함수
void arrowedLine(InputOutputArray img, Point ptr1, Point ptr2, const Scalar& color,
int thickness = 1, int line_type = 8, int shift = 0, double tipLength = 0.1);
#화살표 형태 직선 그리기 함수
void drawMaker(InputOutputArray img, Point position, const Scalar& color,
int markerType = MARKER_CROSS, int markerSize = 20, int thickness = 1, int line_type = 8);
#직선 그리기 함수를 이용하여 다양한 모양의 마커를 그린다.
void rectangle(InputOutputArray img, Point pt1, Point pt2, const Scalar& color,
int thickness = 1, int lineType = LINE_8, int shift = 0);
#직사각형 도형 그리기
void circle(InputOutputArray img, Point center, int radius, const Scalar& color, int thickness = 1,
int lineType = LINE_8, int shift = 0);
# 원그리기
void ellipse(InputOutputArray img, Point center, Size axes, double angle, double startAngle, double endAngle,
const Scalar& color, int thickness = 1, int lineType = LINE_8, int shift = 0);
#타원 그리기
void polylines(InputOutputArray img, inputArrayOfArray pts, bool isClosed, const Scalar& color,
int thickness = 1, int lineType = LINE_8, int shift = 0);
#임의의 다각형 그리기 - 꼭지점의 좌표를 전달 vector<Point> 자료형
문자열 출력하기
void putText(InputOutputArray img, const String& text, Point org, int fontFace, double fontScale, Scalar color,
int thickness = 1, int lineType = LINE_8, bool bottomLeftOrigin = false);
#문자열 출력하는 함수
Size getTextSize(const String& text, int fontFace, double fontScale, int thickness, int* baseline);
#문자열 출력을 위해 필요한 사각형 영역의 크기 가져오는 함수
이벤트 처리
키보드 이벤트 처리
[코드]
int keycode = waitKey();
if (keycode = i || keycode = 'I'){
img = ~img;
imshow("img", img);
}
#waitKey() 함수를 이용하여 키보드 처리
마우스 이벤트 처리
void setMouseCallback(const String& winname, MouseCallback onMouse, void* userdata = 0);
# 시스템 콜백 함수를 사용하여 구현
MouseCallback 인자에 마우스 작동 함수를 구현한다.
[코드]
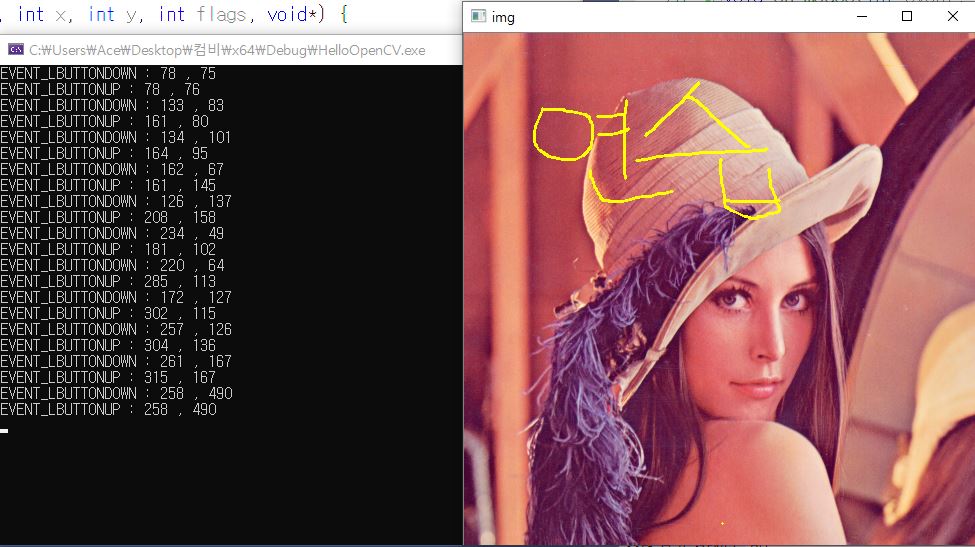
void on_mouse(int event, int x, int y, int flags, void*) {
switch (event) {
case EVENT_LBUTTONDOWN:
ptOld = Point(x, y);
cout << "EVENT_LBUTTONDOWN : " << x << " , " << y << endl;
break;
case EVENT_LBUTTONUP:
cout << "EVENT_LBUTTONUP : " << x << " , " << y << endl;
break;
case EVENT_MOUSEMOVE:
if (flags & EVENT_FLAG_LBUTTON) {
line(img, ptOld, Point(x, y), Scalar(0, 255, 255), 2);
imshow("img", img);
ptOld = Point(x, y);
}
break;
default:
break;
}
}
#그림판 용 작동 코드. flag를 이용하여 체크한다.
트랙바 이벤트 처리
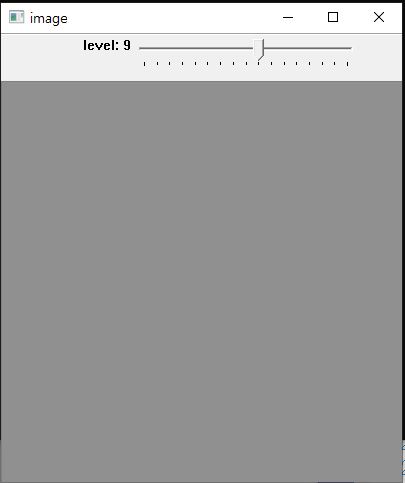
트랙바는 사용자가 지정한 영상의 출력창 상단에 부착된다.
int createTackbar(const String& trackbarname, const String& winname, int* value, int count,
TrackbarCallback onChange = 0, void* userdata = 0);
#마우스와 마찬가지로 createTrackbar 콜백함수에 연결한다.
onChage함수를 만들어 연결시킨다.
int getTrackbarPos(const String& trackbarname, const String& winname);
# 트랙바 현재 위치를 반환한다.
void setTrackbarPos(const String& trackbarname, const String& winname, int pos);
#트랙바를 특정 위치로 옮기고 싶은 경우 사용한다.
유용한 openCV기능
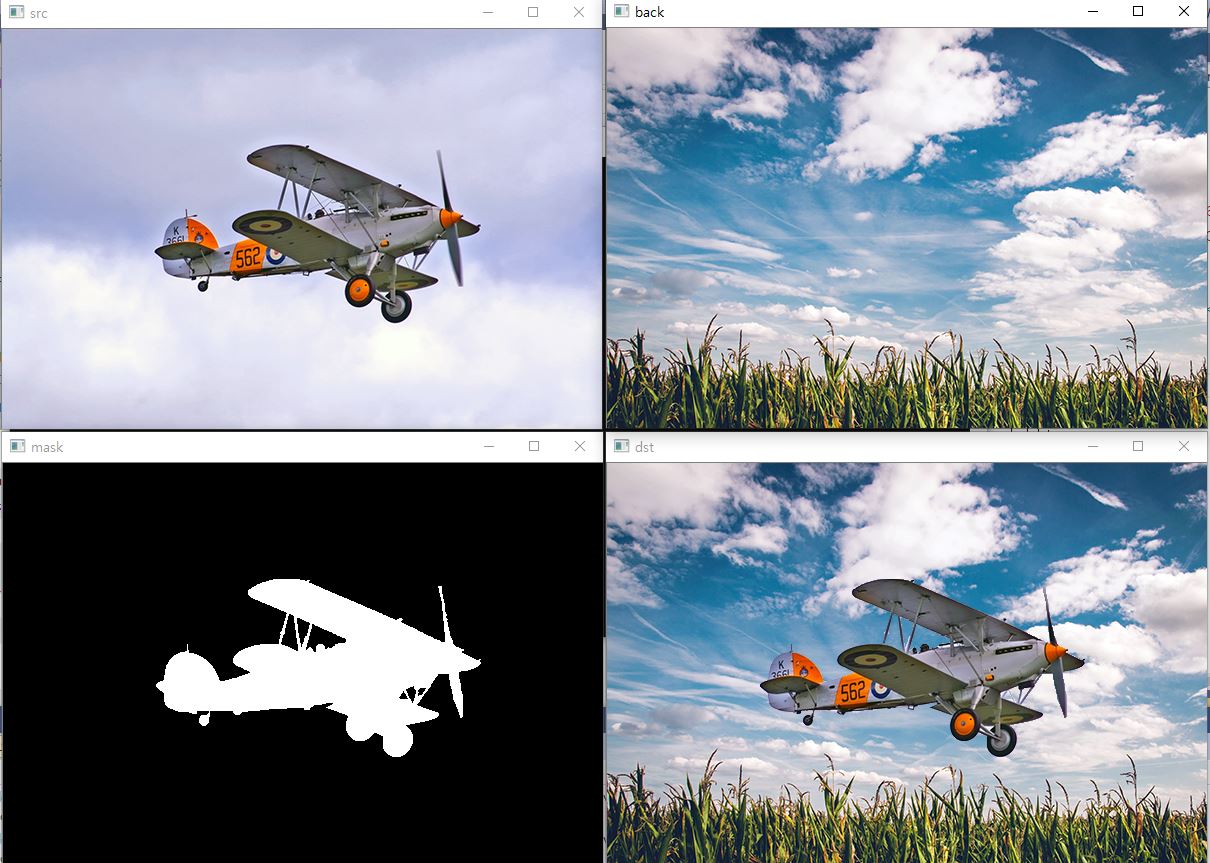
마스크 연산
openCV는 ROI(관심영역) 설정을 위하여 마스크 연산 기능을 지원한다.
일반적 마스크 영상은 흑백 영상을 사요함
Mat& Mat::setTo(InputArray value, InputArray mask = noArray());
# 전에 사용했던 setTo함수를 사용하여 마스크 연산을 진행 할 수 있다.
Scalar sum(InputArray src);
#행렬 전체 원소의 합을 구함
Scalar mean(InputArray src, InputArray mask = noArray());
#행렬 전체 원소의 평균을 구함
void minMaxLoc(InputArray src, double* minVal, double* maxVal = 0, Point* minLoc = 0,
Point* maxLoc = 0, InputArray mask = noArray());
#행렬의 최솟값, 최대값을 찾는 함수. 좌표 정보도 함께 알수 있다.
void normalize(InputArray src, InputOutputArray dst, double alpha = 1, double beta = 0,
int norm_type = NORM_L2, int dtype = -1, InputArray mask = noArrays());
# 행렬을 norm 값으로 정규화하거나 특정 범위로 정규화 할 때, 사용
int cvRound(double value);
int cvRound(float value);
# 반올림 함수
'Image Processing > Computer Vision' 카테고리의 다른 글
| [컴퓨터 비전 - 필터링] (0) | 2020.01.28 |
|---|---|
| [컴퓨터 비전 - 영상의 연산] (0) | 2020.01.22 |
| [컴퓨터 비전 - 영상 밝기와 명암비] (2) | 2020.01.20 |
| [컴퓨터 비전 - opencv기본] (0) | 2020.01.15 |
| [컴퓨터 비전 개요] (0) | 2020.01.14 |
